Natural hatching and artificial hatching of the chicken fertilized eggs
The methods of chicken hatching are divided into natural hatching and artificial hatching.
1. Natural hatching is the hatching of chicks by the brooding of hens;
2. Artificial hatching is the creation of various hatching conditions suitable for the growth and development of chicken embryos,
To hatch chicks. Natural hatching has low production capacity, the hatching time cannot be controlled artificially, and it requires brooding hens to hatch. Artificial hatching methods are widely used in production practice. Depending on the equipment used, artificial hatching can be divided into traditional hatching and machine hatching.
(1) Traditional Hatching Method Through long-term hatching practice, the working people created a unique traditional hatching method, the main methods of which are the fire kang hatching method, the vat hatching method, the barrel hatching method, and the flat box hatching method, etc.
The fire kang hatching method is a traditional hatching method commonly used in the north of our country. This method requires equipment such as a fire kang, a spreading bed, and a quilt. The fire Kang is built with adobe and wheat straw is placed on the kang, and a mat is spread on the wheat straw. The spreading bed is a place where the eggs are continued to be hatched after the middle of the hatching period, and it is set up above the kang, built with wood or bamboo poles, and covered with wheat straw and mats. The quilt is used for wrapping eggs or covering eggs.
The key to the management of the fire kang hatching method is the control of the hatching temperature, and the key to temperature control is mastering the fire-burning technology. The hatching temperature is adjusted by controlling the amount of firewood (coal) burned and the number of times the fire is burned, adding or subtracting the covered quilt, turning the eggs, adjusting the position of the eggs on the kang surface, and adjusting the room temperature, etc. The hatching temperature of the kang hatching method is as shown in Table 2-4.
Table 2-4: Hatching temperature of the Kang hatching method (temperature at the bottom of the lower layer egg)
Hatching Days
1-2
3-5
6-11
12
12-14
15-16
17-21
Temperature (℃)
41.5-41
39.5
39.0
38.0
37.5
38.0
37.5
Fire kang hatching generally hatches a batch every 5~6 days. When hatching, the eggs are first divided into two layers, directly placed on the kang mat, and then covered with a quilt to burn the kang. If the eggs are placed at 4 pm, they are burned again at midnight and the first egg turning is performed. The next morning, the upper layer of eggs is warmer, and the lower layer of eggs is quite warm and does not feel hot, and the upper package begins. The method for the upper package is to pack 1000 eggs per package, with the upper layer of eggs on the kang placed in the lower layer of the package, and the lower layer of eggs placed in the upper layer of the package, then tightly packed, and an additional layer of quilt is added to the package.
After the upper package, the temperature rises sharply, and the eggs should be turned every 2 hours until the upper and lower layers reach the normal temperature requirements, and the eggs should be turned every 4~6 hours. When turning the eggs, the upper and lower layers, the edges, and the middle part of the eggs are interchanged to make all the embryos evenly heated. Before turning the eggs, you should first check the temperature and turn the package (in the direction of turning the package in place). After turning the eggs, if the temperature is too high, you need to “air the package” to cool the eggs. When turning the eggs, the operation should be light and stable to prevent breaking the embryos. After turning, they should be aligned and tightly packed.
Hatch to 5~6 days for the first light, after the light moves to the warm kang, hatch to 11 days for the inspection and spread. The spread hatching period mainly relies on self-temperature hatching, the management is simple, the eggs are still turned on time every day, the position of the eggs is changed, and the quilt is increased or decreased according to the egg temperature to maintain a suitable temperature. When a large number of shells are pecked, the cover is removed to facilitate the embryo to obtain fresh air. Every 2~4 hours, the chicks with dry fluff and eggshells are picked out together, and the remaining live embryos are gathered together to facilitate heat preservation and promote the chicks.
The vat hatching method is a method commonly used by farmers in the Jiangsu and Zhejiang regions of our country. There are two forms: warm water vat hatching and charcoal fire vat hatching.
The vat-hatching method requires equipment such as a hatching vat and an egg basket. The hatching process can be divided into two stages: the vat hatching period (1~10 days) and the spread hatching period (11~21 days). The vat hatching period is divided into two stages: the new vat period (1~5 days) and the old vat period (6~10 days). The egg temperature during the vat hatching period is 38.5~39.0℃ for 1~2 days, and about 38.0℃ for 3~10 days. The adjustment of the hatching temperature mainly depends on adjusting the water temperature or increasing or decreasing the charcoal fire, lifting the cover, interchanging the upper and lower layers of the embryos, and adjusting the number and time of cooling the eggs, etc. The temperature of the spread hatching period is the same as the temperature of the spread hatching period of the fire kang hatching method.
Figure 2-5 is a schematic diagram of the barrel hatching method. The diagram includes the following elements:
Hatching eggs
Stir-fried grain
Wooden barrel
After the hatching eggs are incubated for 3 hours, start turning the eggs, and then turn the eggs 4~6 times a day. When the embryos are moved from the new vat to the old vat, the first egg inspection is performed on all the hatching eggs, and the second egg inspection is performed when they are moved from the old vat to the spreading bed.
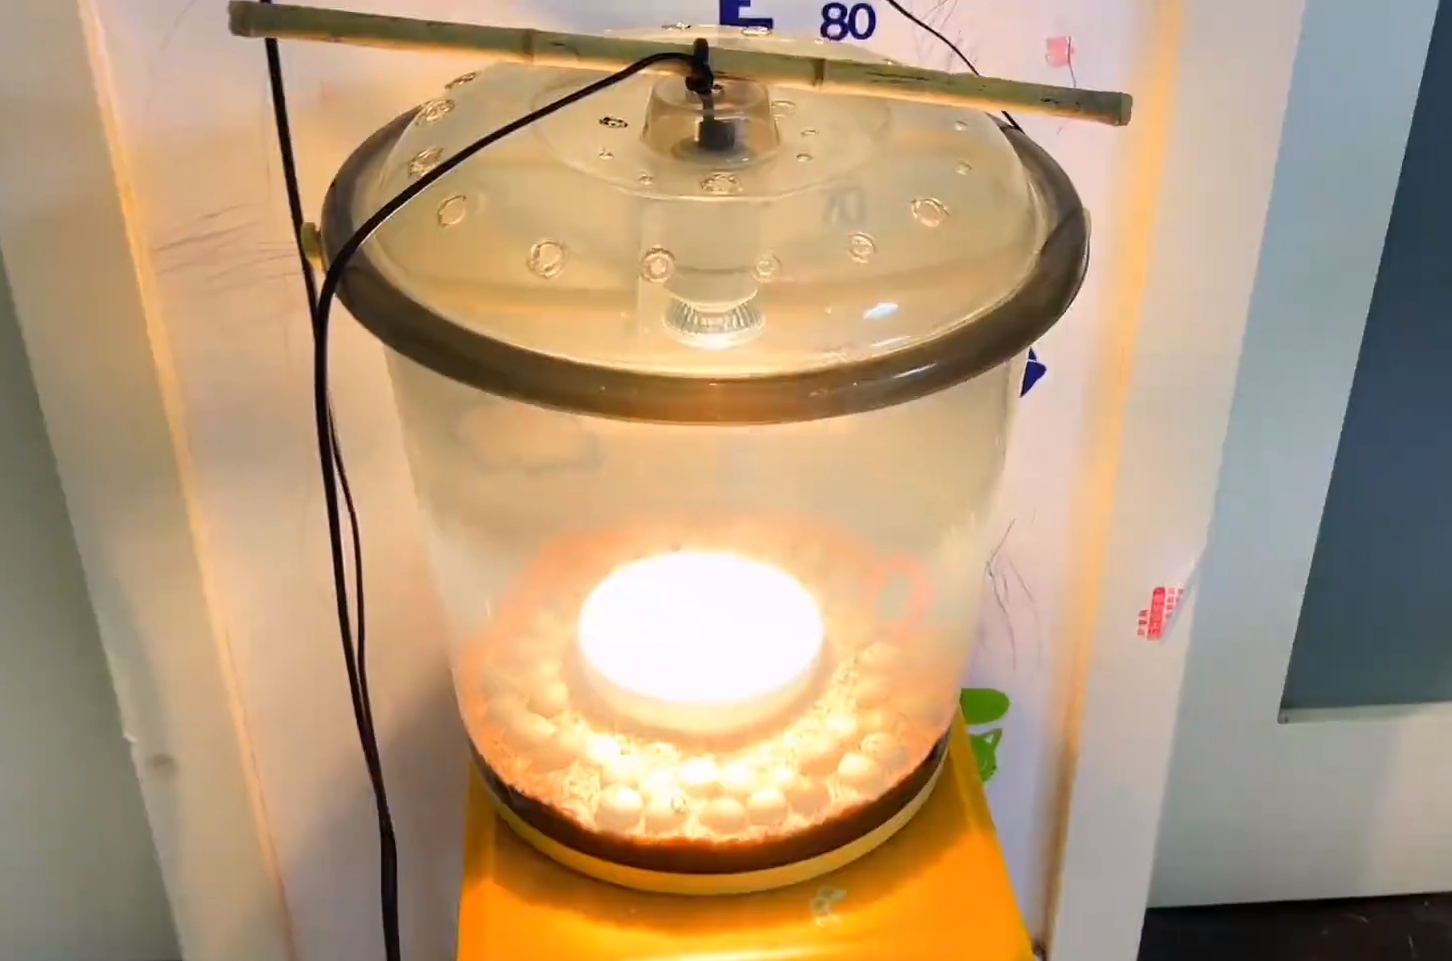
Barrel Hatching Method Also known as stir-fried grain hatching, it is a widely used hatching method in the South and Southwest regions (Figure 2-5).
The barrel hatching method requires equipment such as a hatching barrel and a net bag. The hatching barrel is a cylindrical wooden barrel, with a height of 70~90 cm and a diameter of 60~70 cm. It is lined with several layers of kraft paper for insulation. Each barrel holds about 30 bags of eggs, with about 60 eggs per bag.
The main operations of the barrel hatching method are stir-frying grains, warming the barrel, warming the eggs, entering the barrel, and turning the eggs. For the first hatching each year, the rice is first stir-fried to hatch new eggs. Each pot is stir-fried about 2.5 kg at a time, and then it is wrapped in linen or gauze. The temperature of the stir-fried grain falling into the barrel is 38~39℃. The upper and lower layers of the hatching barrel are slightly higher, at 40~42℃. After 8~10 days, only the bottom two layers need to be stir-fried. Before incubation, a drying cage is preheated in the hatching barrel. The hatching eggs can be warmed in the sun, and on cloudy days, the grains can be stir-fried indoors to “brand the eggs”, so that the egg temperature reaches a level similar to that on sunny days. When entering the barrel, a layer of cold grain is placed at the bottom of the barrel, and then two layers of hot grain are placed. After the hatching eggs are wrapped in linen, a layer of hot grain is added according to its cold and warm, or a layer of hot grain is added every two layers, and a layer of linen is added every other layer. Finally, two layers of hot grain and one layer of cold grain are placed on top, and then a layer of quilt is added. After a few batches of barrels, the “old eggs” that have been hatching for a long time can also be used to hatch the newly incubated eggs, and there is no need to stir-fry the grains, that is, the method of “old eggs hugging new eggs” is adopted. The new eggs that start to hatch are continuously heated with hot grains 2~3 times to set the temperature of the hatching eggs, and then the eggs are turned 3-4 times a day. After 12~13 days of hatching in the barrel, it is transferred to the spreading bed for self-temperature hatching.
Figure 2-6 is a cross-sectional view of the flat box hatching method (unit: cm). The diagram includes the following elements:
Upper part of the hatching
Rotating egg rack
Rice straw mud
Iron sheet
Adobe
Charcoal fire and rice straw ash
Damp-proof brick
The flat box used in the flat box hatching method consists of the upper part of the hatching box and the lower part of the heat source (Figure 2-6). There are 7 layers of egg racks in the hatching box that can be rotated together. The upper 6 layers are round egg sieves, and the lowest layer is an empty plaque for heat insulation. The lower part of the box body is the heat source part, which is built with bricks or adobe around it. The heat source is generally provided by a charcoal fire or a honeycomb coal stove, and there are also those provided by biogas, kerosene, liquefied gas or electric heating plates. Whether the temperature inside the box is uniform up and down, left and right, and front and back is mainly adjusted by “turning the sieve” and “adjusting the sieve”.
Before the hatching eggs are incubated, the temperature inside the box is required to reach above 40℃. After incubation, the “turn sieve” is performed every 2~3 hours, each time turning 180°. And according to the specific situation to carry out “adjustment sieve”, that is, the 6 layers of sieve up and down to adjust, so that the eggs in the box are heated evenly. Turning eggs and lighting eggs are the same as the kang hatching method. When hatching to 10~11 days, the upper spread hatches to the chicks. (2) Machine Hatching Method
The machine hatching method is a relatively advanced large-scale artificial hatching method. Machine hatching uses an automatic temperature and humidity adjustment system, which is easy to operate, has a large hatching volume, small labor intensity of workers, high labor productivity, and good hatching effect. Machine hatching is not affected by the hatching season and can be hatched all year round. But the investment is large, the hatching cost is higher than the traditional hatching method, and it needs to have a stable and sufficient power supply.
Types of incubators Incubators can be divided into two major categories: flat incubators and three-dimensional incubators. Flat incubators are divided into single-layer and multi-layer, and most of them use electric heating tubes for temperature supply, rod-shaped bimetallic sheet or mercury electric contact thermometer for automatic temperature control, and also have automatic egg turning devices and uniform temperature fans. This type of incubator has a small hatching volume and is now generally used for the hatching of rare poultry eggs or for teaching and scientific research. The three-dimensional incubator belongs to large-scale hatching equipment, and according to the structure of the box body, it can be divided into two major categories: box-type incubators and aisle-type incubators.
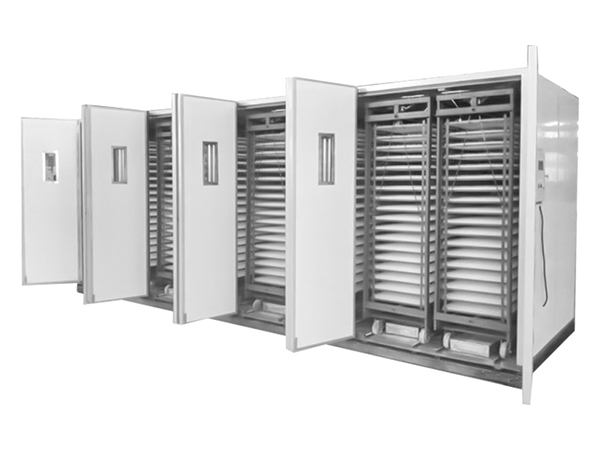
(1) Box-type incubators can be divided into egg tray racks and egg rack car types according to the structure of the egg rack. The egg tray rack type can be divided into drum type and octagonal type. Their egg tray racks are fixed in the box and cannot be moved, and it is inconvenient to enter the incubation and operation management. At present, the egg rack car type electric incubator (Figure 2-7) is mostly used. The egg rack car can directly go to the egg library to load eggs, and after disinfection, it is pushed into the incubator, reducing the number of times the hatching eggs are loaded and unloaded.
Figure 2-7 Box-type incubator
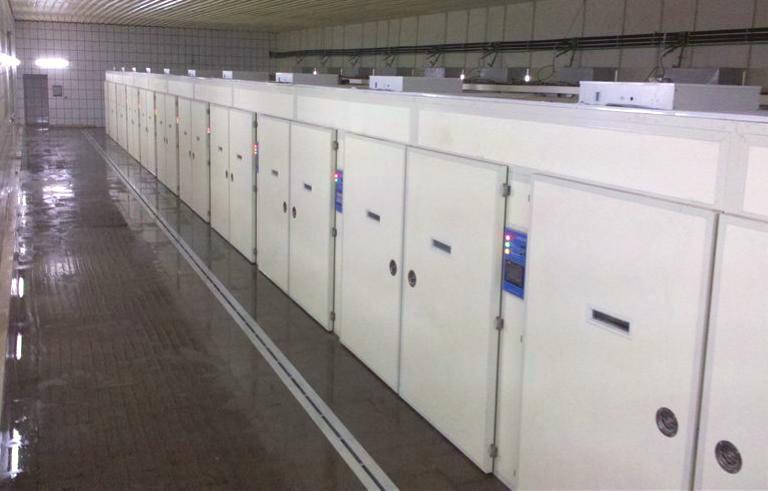
(2) The aisle-type incubator is composed of multiple box-type incubators combined and assembled in series, equipped with an air stirring and heat conduction system, and the egg capacity is generally more than 70,000 (Figure 2-8). When using, put the egg code plate on the egg rack car, after disinfection and preheating, push it into the aisle one by one along a certain track, and transfer it to the chick machine after 18 days. The fresh air in the machine is sucked in from the air inlet, and after heating and humidifying, it is blown to the opposite door from the upper air duct by multiple high-speed fans. Most of the gas is reflected down into the aisle, and after passing through the egg rack car, it returns to the air intake chamber. This cycle makes full use of the metabolic heat of the embryo egg, there is no dead corner in the box, the temperature is uniform, so it saves electricity compared to other types of incubators, and the hatching effect is good.
Figure 2-8 is a schematic diagram of the aisle-type incubator. The diagram includes the following elements:
Air inlet
Air outlet
Cooling water inlet
Humidity supply hole
Compressed air
Electrical control part This type of incubator is a large-scale hatching equipment that is combined and assembled in series with multiple box-type incubators. It is equipped with an air stirring and heat conduction system, and the egg capacity is generally more than 70,000. The fresh air in the machine is sucked in from the air inlet, and after heating and humidifying, it is blown to the opposite door from the upper air duct by multiple high-speed fans. Most of the gas is reflected down into the aisle, and after passing through the egg rack car, it returns to the air intake chamber. This cycle makes full use of the metabolic heat of the embryo egg, there is no dead corner in the box, the temperature is uniform, so it saves electricity compared to other types of incubators, and the hatching effect is good.
Structure of the Incubator
(1) The main structure consists of the box body, egg rack car, seed egg tray, and active egg turning rack. The box body of the incubator is composed of a frame, inner and outer panels, and an intermediate sandwich, with a wall thickness of about 50 mm. The frame of the metal structure box body is generally a thin steel structure, the outer layer is coated with plastic steel plate or color plate, and there are also PVC plates. The inner panel mostly uses aluminum alloy plates, and the sandwich is filled with polystyrene or polyurethane insulation material, which is sturdy and beautiful as a whole. The egg rack car is a full metal structure, and the egg rack can be fixed on four hangers and can move. The commonly used egg rack car has 12~16 layers, and each layer asks for a distance of 120 mm. The hatching tray and the maintenance tray of the egg rack car type electric incubator mostly use plastic egg trays, which are easy to wash and disinfect, and are sturdy and not easy to deform. In addition to using plastic grille or hole type seed egg trays, the egg rack type incubator also uses iron wire wooden grille type hatching trays, that is, wooden strips are nailed into frames, and the middle grille strips are made of equal numbers of upper and lower layers of iron wire. According to the different forms of egg racks, the active egg turning rack is divided into three types: barrel type, octagonal type, and rack car type. They all use the longitudinal or horizontal central axis as the center, use wood or metal to make the egg tray bracket, insert and fix the egg tray, and use the gate or manual worm gear to turn the egg tray rack. When turning the eggs, the center of the egg tray support is used as the fulcrum, and it tilts 45°~55° to the right and left respectively.
(2) The temperature control system is composed of an electric heating tube (or infrared rod) and a temperature regulator. When designing, the electric heating tube (heat source) should be placed between the blower blade and the side wall of the incubator. The power of the electric heating tube is equipped with 200-250 watts per cubic meter, and the incubator that can hold 10,000 seed eggs often installs a total power of 1800 watts of electric heating tubes, of which 1200 watts are the basic heat source, and 600 watts are the auxiliary heat source. The auxiliary heat source is used when the incubation starts or the outside (inside the incubation room) temperature is low. After the temperature in the incubator is normal, the auxiliary heat source is turned off. There are many types of temperature controllers, and you can choose electronic tube temperature controllers, transistor temperature controllers, integrated circuit temperature controllers, and computer temperature controllers. At present, temperature sensors mostly use thermistors, platinum resistors, thyristors, conductive meters, etc. Thermistors have the characteristics of short temperature sensing time, fast adjustment, and small size, while platinum resistors have high sensitivity, and thyristors overcome the disadvantages of frequent start-up contacts of relays that are easy to wear and burn as non-contact switches. Conductive meters are usually used as high and low temperature control and backup circuit temperature control, with reliable use characteristics.
(3) The simple humidification device of the humidity control system is generally to place 2-4 galvanized iron shallow water trays at the bottom of the incubator box to maintain the humidity in the machine with the evaporation of water in the water tray. At present, the more advanced humidification system is to install a blade-type water wheel on the water tray, which is driven by a micro motor to stir the water surface to increase the evaporation area. When the humidity reaches the requirement, the water wheel stops turning, and the water tray is equipped with a float valve to control the water level height. The humidity inside the machine is adjusted through the humidity sensing and humidity control circuit.
(4) The alarm system is composed of a temperature regulator (that is, a mercury conductive meter), an electric bell, and an indicator light (red and green light bulbs). The temperature regulator acts as a temperature sensing element. Generally, high temperature alarms are set, and some are set for high and low temperature alarms. When the temperature inside the machine deviates from the specified temperature by 0.5℃, an alarm will occur so that the incubation personnel can eliminate the fault in time.
(5) The cooling system is due to the large amount of incubation in batches, and the self-temperature is very high in the middle and late stages of embryo development, which can easily cause serious overheating of the incubator. In order to overcome overheating, both the incubator and the chick machine are equipped with cooling or cooling devices. The cooling system has two forms: air cooling and water cooling. The air-cooled cooling system is composed of a fan and a control circuit installed in the rear panel air door box of the incubator. When the temperature of the box body exceeds the set value or the temperature rises quickly, the control system will automatically open the large exhaust door or open the small exhaust fan of the exhaust port according to the needs to increase the exhaust volume. In the incubation environment where the outside temperature is high, it is advisable to use a water-cooled cooling system, that is, when it is overheated, the over-temperature alarm, control the solenoid valve of the cold water pipe (cold row) to open the cold water to lower the machine temperature. The cold row is a curved copper pipe, installed between the machine wall and the blower blade.
(6) The egg turning system manual egg turning usually uses a worm gear and worm structure, and uses a hand crank to push the entire egg tray rack to rotate; electric egg turning is driven by a small motor through a reduction mechanism and a long shaft to drive the worm gear and worm, and then through a crank to push the sliding rod to make the egg tray bracket move left and right; pneumatic egg turning is mostly used in aisle-type incubators, each egg car is equipped with cylinders, air valves and quick connectors, etc., when the car is pushed into the incubator, the connector on the car is inserted and connected with the fixed connector inside the machine.
(7) The ventilation and ventilation system is composed of air inlets, air outlets, motors, and fan blades. The air inlet is generally located at the bottom of the incubator, and the air outlet is located at the top of the incubator. The fan is located on the side or in the middle of the incubator, blowing from one side to the other side or from the middle to both sides. The size of the air inlet and the air outlet can be adjusted to meet the ventilation requirements of different incubation periods. In addition to providing fresh air, ventilation also plays a role in temperature equalization, making the hatching eggs evenly heated and ensuring normal embryo development.
(8) The setting and display system is installed on the front control box door of the incubator with a setting and display device, and the set temperature and humidity can be stored in the control system through the display device, and the actual temperature and humidity changes inside the machine can be displayed during the operation of the incubator. The display can also reflect egg turning control, wind door control, various alarm displays, automatic control response, egg rack position, lighting system and safety device information.
Installation of the Incubator
The debugging of the incubator is generally installed by professionals. If you need to install it yourself, you must read the instructions provided by the manufacturer before installation and strictly follow the requirements of the instructions. After the incubator is installed, it must be carefully debugged. Before starting the machine for debugging, first check whether the screws in each part are tightened, whether the whole machine is stable, and whether the power wiring is correct and reliable. If no abnormalities are found, the machine can be started. When running, first check whether the direction of each motor is correct and whether the tension of the fan belt is appropriate. Carefully calibrate and check the performance of each part and the automatic control of temperature and humidity, especially pay attention to the calibration of temperature and humidity and the sensitivity of the alarm device. After the above checks are abnormal, the machine will run for 1~2 days, and it can be incubated only after everything is normal.
Maintenance and Repair of the Incubator The incubator has a high degree of mechanization and automation. Users must regularly maintain and repair it to ensure its normal operation and extend its service life, thereby achieving the purpose of improving the hatching rate and reducing costs.
(1) Weekly maintenance checks the water level of the humidifying water basin, the sealing of the machine door, and the operation of the air door. Use a semi-dry rag to wipe the outside of the machine box and control cabinet. The chick machine must clean the humidifying water basin and evaporating pan every batch, and clean the fluff on the top of the machine.
(2) Monthly maintenance checks whether the fan, humidification, and egg turning belts are intact, checks the heating function, ultra-high temperature alarm function, egg turning function is normal, thoroughly cleans and disinfects the equipment (the incubator must clean the machine, humidifying water basin and humidifying evaporating pan every batch).
(3) Quarterly maintenance cleans the probe, calibrates the temperature and humidity, the fan bearing needs to add butter once, the egg turning worm gear is cleaned with oil and then lubricated with butter, the screw and sliding mating parts of the air door mechanism need to add butter, humidification, The egg turning reducer needs to change the oil once, and a comprehensive inspection of the control functions of the system.
(4) Maintenance when not in use for a long time Before the machine is left unused for a long time, the machine should be turned on to heat and dry the machine, and the water in the humidifying water basin should be dried and dried. All rotating parts should be cleaned and protected with butter to prevent rust. The machine needs to be turned on to heat and dry the machine once a month.
Operation of the Incubator
(1) Preparation before incubation
The incubation room should be located in a convenient place, but it should be far away from the main traffic line (more than 500 meters) and residential areas (more than 1000 meters). The incubation room should have good insulation and ventilation conditions. During the incubation period, the temperature of the incubation room should be 22-25℃, and the relative humidity should be maintained at 55%~60%. There should be special ventilation holes or fans in the incubation room to keep the air in the room and the incubator fresh at all times. During the incubation process, a one-way process should be established from the acceptance of hatching eggs, to incubation, chicks, sex identification, vaccination, and sale of chicks, and it cannot flow back or cross-run. Before incubation, a hatching plan should be made in advance according to the specific situation, and the hatching process should be arranged. The incubation personnel should fully understand and master the various performances of the incubator. One to two weeks before the official incubation, the incubator should be repaired and the incubation room and incubator should be cleaned and disinfected. Then calibrate the thermometer, test the machine for 1~2 days, and it can be incubated only when there is no abnormality.
(2) Egg-laying operation
Egg-laying is to code the hatching eggs on the egg tray. The hatching eggs should be loaded into the egg tray with the blunt end up about 12 hours before incubation, and the egg tray should be moved into the incubation room for preheating. The best time for egg-laying is after 4 pm, so that a large number of chicks can be during the day, which is more convenient for work. Generally, eggs are laid every 5~7 days. In the same incubator, when batch incubation is adopted, each set of egg trays that are laid each time should be marked with a special conspicuous mark. Each set of egg trays for each batch of incubation should be staggered on the egg rack. The purpose is to make the “new eggs” with a short incubation time and the “old eggs” with a long incubation time adjust the temperature to each other.
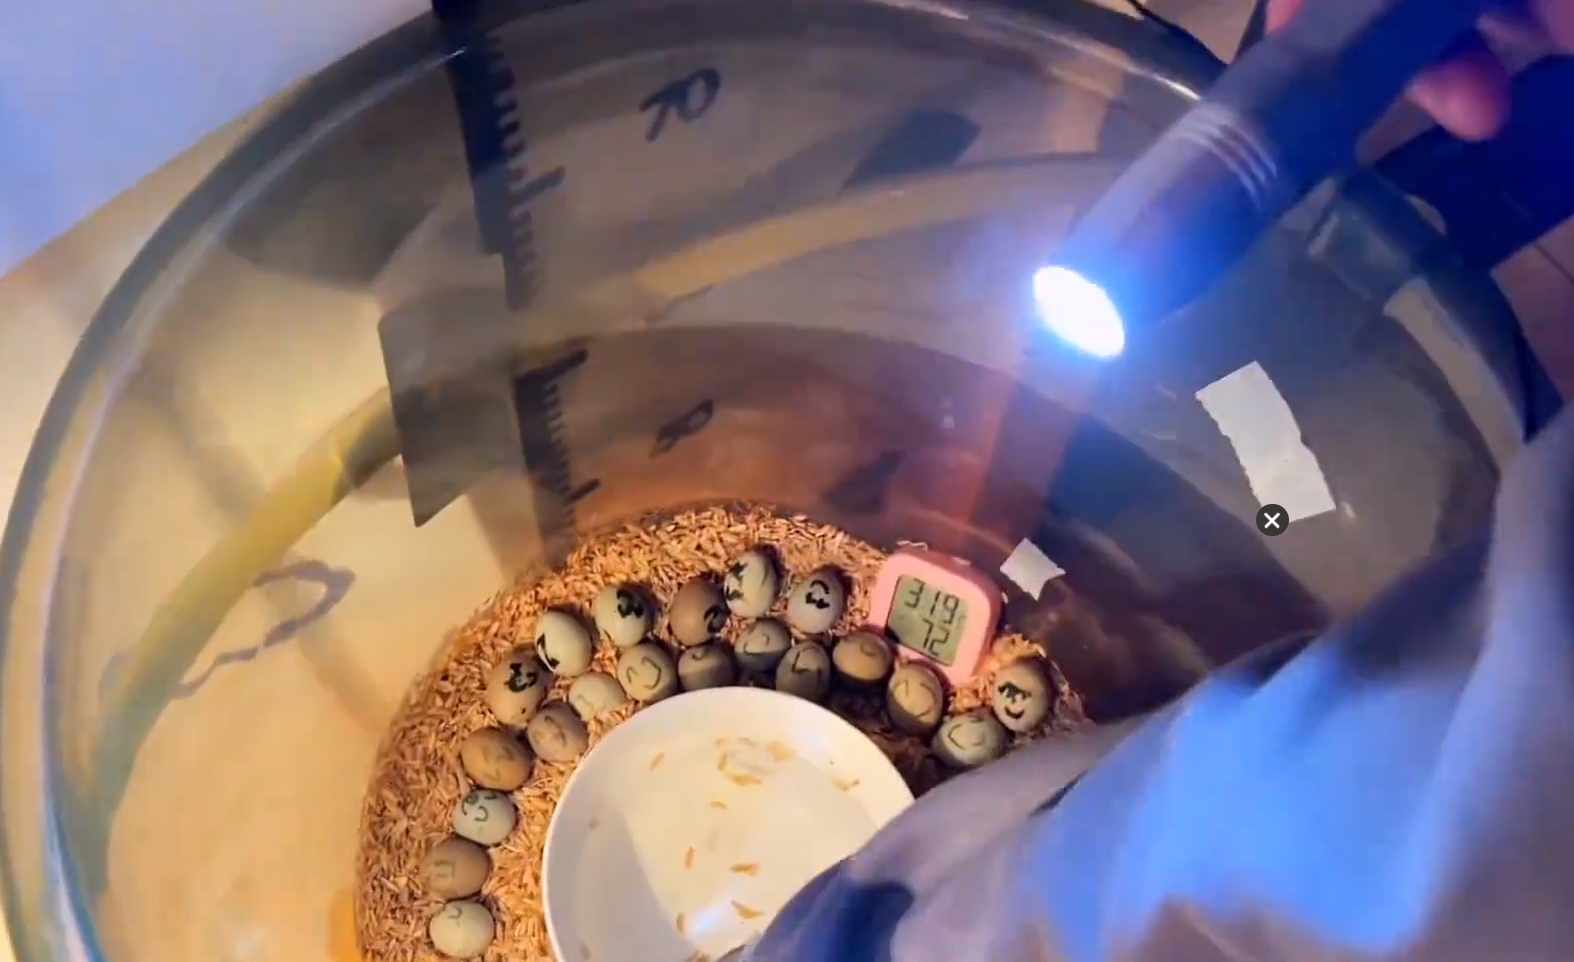
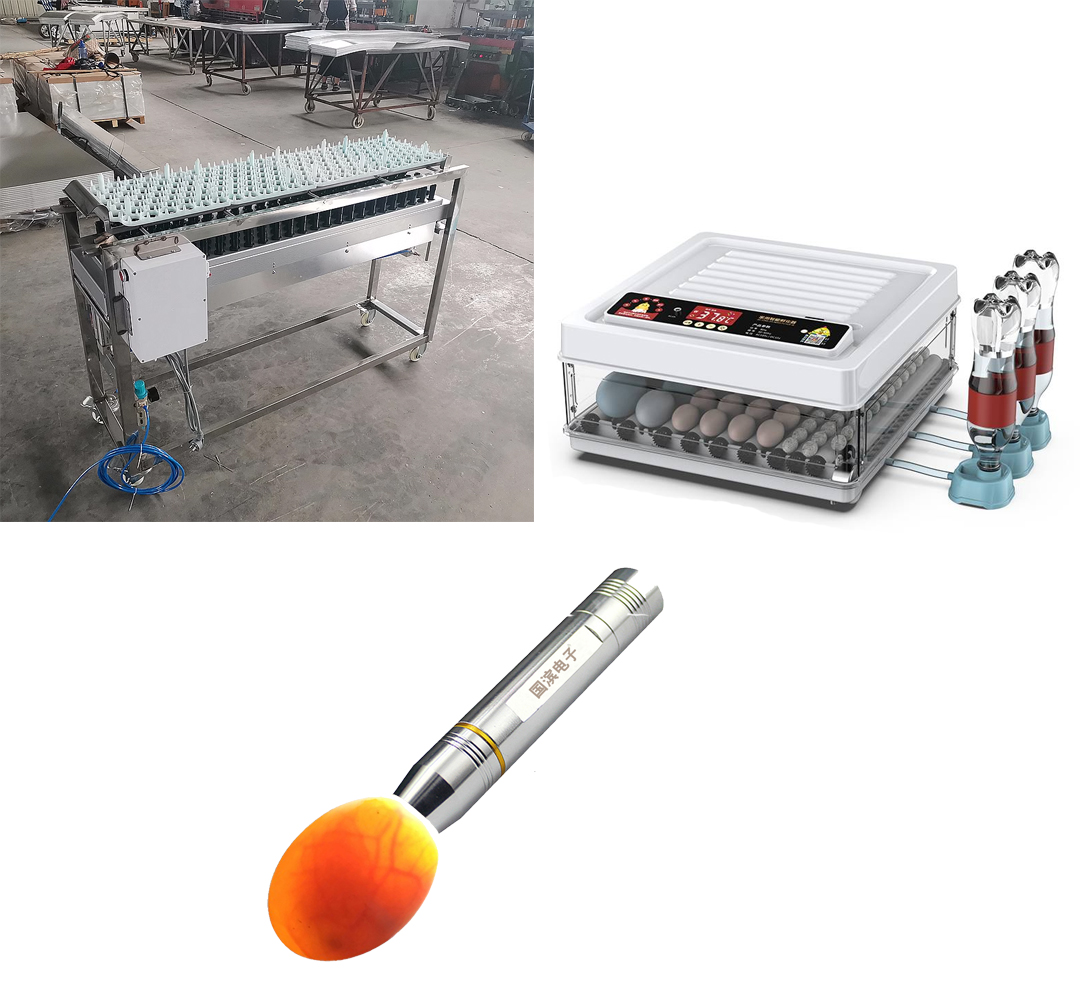
(3) Using the egg-laying device to inspect the development of the embryo through the light, timely eliminate the infertile eggs and dead embryo eggs, improve the hatching rate of the hatching eggs and the utilization rate of the egg tray. The commonly used egg-laying utensils are shown in Figure 2-9. During the entire incubation period, eggs are usually inspected 2~3 times. The first egg inspection is performed 5~6 days after incubation. The main task is to detect infertile eggs and dead embryo eggs and observe the development of the embryo. The second egg inspection is generally performed on the 18th or 19th day of incubation. The purpose is to observe the development of the embryo on the one hand, and to eliminate the dead embryo eggs on the other hand, to prepare for the transfer of the tray or the upper spreading bed. Sometimes in the 10~11 days of incubation, the closing of the urinary sac blood vessels at the small head of the egg is also spot-checked to determine the high and low of the incubation temperature. The embryonic age and inspection conditions of each egg inspection are shown in Table 2-9.
C. Egg candler lamp: 1. Iron shell 2. Flashlight lamp holder 3. 8~12 volt power supply 4. Wooden handle 5. Push switch 6. Flashlight reflector bowl
Table 2-5 shows the embryonic age and inspection conditions for each egg candler:
Time
First candling
Second candling (Random check)
Thrid candling
Days to candling (day)
5
10-11
19
Stage nickname
Qizhu , Shuangzhu
Helong
Shanmao
No-sperm egg
The inside of the egg is transparent, the shadow of the floating yolk is faintly visible, and the boundary line of the air chamber is not clear
The inside of the egg is transparent, the yolk shadow increases or the scattered yolk floats, the shadow is not easy to see, the air chamber enlarges, and the boundary line is not clear.
Embryo development condition
Live
Embryo
The boundary line of the air chamber is clear, the embryo floats up, the curved shape of the embryo body is faintly visible, the head is large, there are obvious black spots, the body is curved, there are blood vessels expanding around, distributed like a spider. The weak embryo body is small, the color of the blood vessels is light and thin, and the expansion surface is small.
The air chamber enlarges, the boundary is clear, the embryo body enlarges, the urachus blood vessels obviously close towards the tip, surrounding all the egg white. The weak embryo develops slowly, the urachus blood vessels have not yet closed, the small head of the egg is light and transparent.
The air chamber obviously enlarges, the boundary line is more obvious, except for the air chamber, the embryo occupies the space of the egg and is pitch black, only the curved edge of the air chamber is visible, the blood vessels are thick, sometimes the black shadow of the embryo is seen flashing. The edge of the weak embryo’s air chamber is even, and obvious blood vessels can be seen.
Dead
Embryo
The boundary line of the air chamber is blurred. A red blood ring or blood line appears in the yolk.
The air chamber obviously enlarges, the boundary is not clear, the inside of the egg is semi-transparent, there is no distribution of blood vessels, there is a dead embryo lump in the center, which floats as the egg rotates, and there is no feeling of egg temperature.
The air chamber enlarges, the boundary is not clear, the inside of the egg is dark and unclear, there are black blood vessels at the edge of the air chamber, the small head is light in color, and it is not warm.
Purpose of egg candling
1. Observe whether the early embryonic development is normal.
2. Eliminate infertile eggs and dead ones.
1. Observe whether the development of the early to mid-term embryo is normal.
2. Eliminate dead embryos and infertile eggs that were missed in the initial inspection.
1. Observe whether the development of the mid to late-term embryo is normal.
2. Eliminate dead embryos.
Egg candling should be carried out in a dedicated egg candling room. The temperature in the egg candling room should be suitable to prevent low temperatures from adversely affecting the embryo. The operation of egg candling strives for stability, accuracy, and speed. The egg candling personnel should concentrate their energy to prevent omissions or errors. To improve the utilization rate of the egg tray and the incubator, the gap in the egg tray that has been candled can be filled with the same batch of embryos, and the extra egg tray is reserved for the next batch of incubation.
(4) On the 18th or 19th day of incubation, after the second candling, the embryos in the incubator can be moved into the chick machine to prepare for the chicks, which is called moving the tray. If you move to the spreading bed for self-temperature incubation and hatching, it is called spreading. The action of moving the tray or spreading should be light, stable, and fast, and try to prevent the occurrence of broken eggs and egg temperature drop. Before moving the tray, the temperature inside the chick machine should be raised to the specified hatching temperature. After moving the tray, stop turning the eggs. The non-automatic humidification chick machine should increase the water tray to increase the humidity inside the machine. When the temperature inside the chick machine is uneven, the tray should be adjusted 1~2 times a day. When using the spreading bed for self-temperature hatching, you should often check the temperature of the eggs on the spreading bed, and use measures such as increasing and decreasing the number of quilts and turning eggs to adjust the egg temperature.
(5) Hatching and assisted production technology will start to hatch continuously after 20 days of incubation, and the peak of hatching will enter on the half day of 20 days, and all hatching will end on the 21st day. After hatching in batches, generally every 4 hours, the chicks that have hatched and dried their feathers and the navel has shrunk well, and the empty eggshells are picked up in time. In the later stage of hatching, the embryos that have broken shells should be combined and placed on the top of the chick machine to promote the weak embryos to hatch as soon as possible. When picking up chicks, the action should be light and fast to prevent breaking the embryo eggs and injuring the chicks. Do not open the machine door frequently to prevent the temperature and humidity inside the machine from dropping too much and affecting the hatching. Every time a chick is picked up, every 100 chicks are placed in a disinfected chick box or a chick basket with a soft cushion, and then placed in a chick storage room at about 25℃, allowing the chicks to rest fully.
Normally, chicks are generally not assisted in production within the time, but in the later stage, the embryos that have dried up the inner membrane or exposed fluff and have no strength to struggle in the shell should be gently peeled off, separated from the mucous membrane and shell membrane, and the head should be gently pulled out of the shell. Let it struggle to break the shell. After the hatching is over, the hatching room and the chick machine are thoroughly cleaned and disinfected, and then dried or air-dried, ready for the next hatching.